5 minutes
clearfake infra tracking with self-hosted n8n
 bee-ute-iful butterfly (from the butterfly biosphere in Utah)
Introduction
Howzit! I suppose this is my first post on here. Short and sweet. You’ll find that maybe I’ll decide to just use unrelated pictures at the top of my posts. I think I can do that, right?
Ever since ClearFake started using the EtherHiding technique, which was in 2024, I’ve been pretty keen on not only understanding how it works, but also with tracking updates to the infrastructure. I’ve accomplished both, and so have a lot of other people, but with my recent deep dive into automation I wanted to pair the two together.
Beginnings
I recently resurrected my NAS, which is running Unraid, as I had an itch to organize the terabytes of old media my family had accumulated. I wanted this old media to be digestible so I used Plex. Through setting up Plex, I realized that Unraid makes it super easy to spin up Docker containers and their community apps section further enables that. I’m really hoping this post doesn’t turn into the mechanics of setting up n8n in Unraid (maybe that deserves it’s own post), but what I’m really trying to show here is how I was able to still accomplish automation for (mostly) free 99.
The Setup
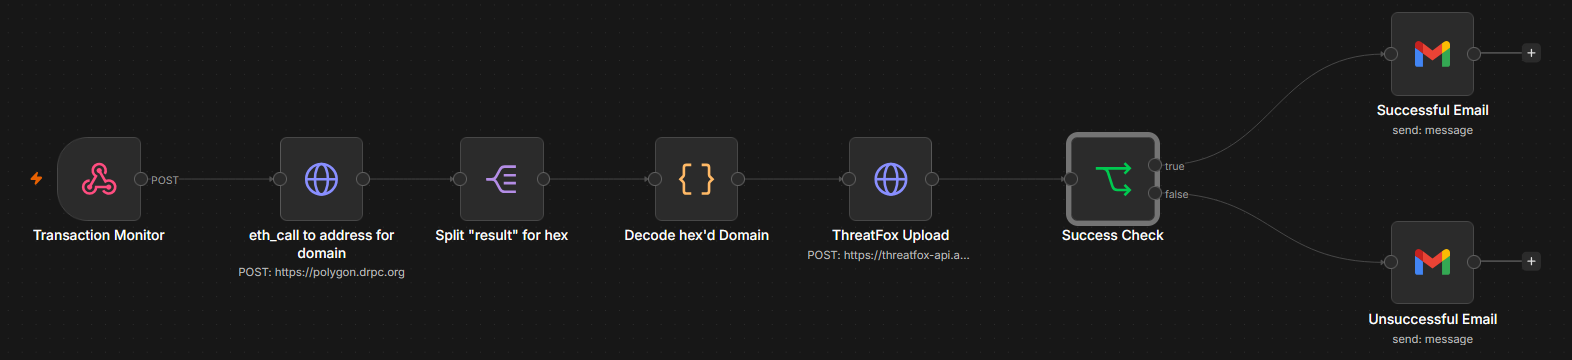
The above snip is the final workflow.
The initial trigger is a webhook from Alchemy, which among other things, is a tool that allows us to monitor specific addresses for transactions. When an address we are monitoring is involved in a transaction, a webhook is sent to our n8n endpoint.
The next step in the workflow is probably the one that has changed the most. Initially when setting this up, I used the EtherScan API to pull the transactions associated with the address, split out the most recent, and then decoded that. However, I realized that it’s probably easier to just do what the malware does, so right now, it is supplying the address, 0x08207B087F61d7e95E441E15fd6d40BEfd6eD308 and method, 0x38bcdc1c, in an eth_call to a Polygon DRPC endpoint in order to get the input data. I think it’s also important to note that for this request, I’ve included headers like sec-ch-ua-platform and user-agent to ensure the request goes through.
The Split node is pretty simple - it splits out the “result” field that returns from the eth_call request. The result is hex encoded, which gets decoded by some JavaScript. The decoded domain then gets passed into another HTTP request node, prefilled with the necessary arguments to create an indicator using the ThreatFox API. The status of this request gets passed into an “If” node. If the response is “ok”, an email gets sent to myself with my own Gmail account with the indicator and notification that the indicator was successfully added to ThreatFox. If it’s anything but “ok”, the email will still have the indicator, but it will tell me instead that the addition was unsuccessful.
Additional Steps
Okay so it wasn’t all that easy - it may have been for some of you, but there were some additional steps to get all this functioning and flowing the way I wanted it.
First - the webhook with Alchemy. Since I’m running this locally on my NAS, I didn’t want to just expose that to the internet all willy-nilly, so I came across ngrok which allows for some tunneling action. If you’re familiar with Cloudflare tunnels, ngrok is pretty much the same thing. It’s free to setup an endpoint and it’s pretty easy to get the container up and running in Unraid and pointing to your n8n instance. It’s also just as easy to configure n8n to use your ngrok endpoint for webhooks.
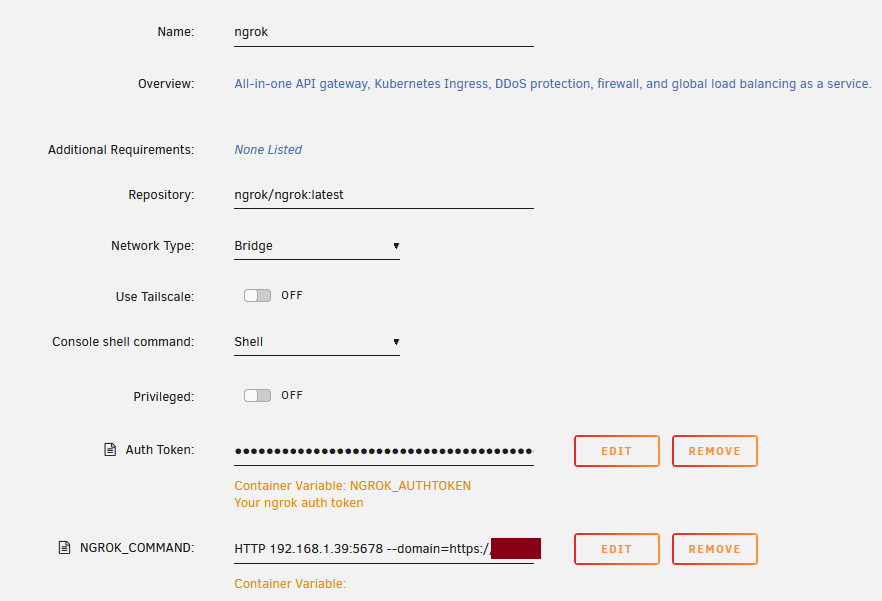 ngrok container settings
 n8n container settings
Once you got n8n setup with ngrok, you can configure the webhook in Alchemy. Setting up a webhook in Alchemy is free and extremely easy. Production webhook url from n8n webhook node goes into the webhook url box on Alchemy, and the ClearFake address goes into the address box. It’s also important when setting this up that you select the correct chain network. In this case, it’s Polygon, so I selected Polygon Mainnet.
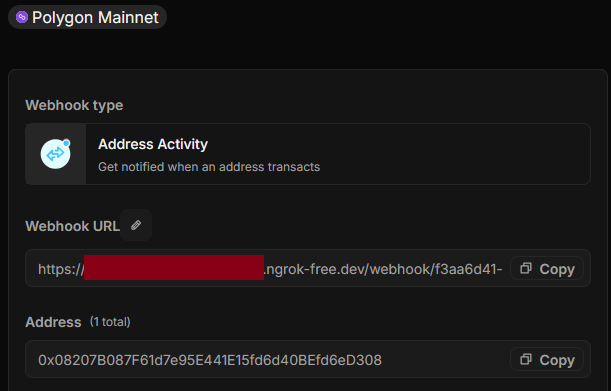 Alchemy setup
Lastly, setting up the Gmail credential in n8n is what I struggled with the most, as I didn’t have much experience with it. It seems easy enough in hindsight, but this is what took the longest. You’ll have to setup a project with the Google cloud console, enable Gmail in the API settings, add your ngrok endpoint to the authorized domain list, create a new web application client, and then add the URL from the n8n Gmail Oauth credential setup to the authorized redirect URI for that client. Copy the Client ID and secret for the client into your n8n Gmail credential. You’ll have to do the login process for Google from the ngrok endpoint url, as the login fail if you try and do it from your localhost.
Conclusion
Overall, I thought this project was a pretty good introduction into automation workflows. There’s still some more I’d like to add, like automating some urlscan lookups after a new domain is identified or automatically identifying new contract addresses being used in EtherHiding infrastructure. Nonetheless, I had a good time. Thanks for listening. Shoots!
875 Words
2026-08-07 00:00